


WIP New class 142
Page 1 of 2 • 1, 2 ![]()

WIP New class 142
![]() by robbysmith13 Mon Apr 09, 2012 9:25 pm
by robbysmith13 Mon Apr 09, 2012 9:25 pm
I am starting on making a brand new Class 142 with every control and function like Radio, announcement plus a 3D Cab with Interior and Exterior with a Working and changeable Destination display.
Exterior Working Bogies, Display, Hopefully operating doors, Moving wheels and functional lights.
Interior On/Off interior lights, Full working announcements, Operating doors.
If anyone drives a class 142 please can they post what they do starting the train up like from the outside to the cab, Thanks
robbysmith13- Posts : 28
Join date : 2012-04-09
Age : 25
Location : Bolton, England
Re: WIP New class 142
![]() by viccylinefan Mon Apr 09, 2012 10:07 pm
by viccylinefan Mon Apr 09, 2012 10:07 pm
 Good luck with it.....
viccylinefan
viccylinefan- Posts : 196
Join date : 2011-07-17
Age : 25
Location : London, England
robbysmith13- Posts : 28
Join date : 2012-04-09
Age : 25
Location : Bolton, England
Re: WIP New class 142
![]() by robbysmith13 Tue Apr 10, 2012 5:44 pm
by robbysmith13 Tue Apr 10, 2012 5:44 pm
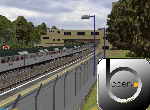
I have got a picture of the exterior I will be using on the class 142.
https://2img.net/r/ihimg/photo/my-images/256/cl142.png/
robbysmith13- Posts : 28
Join date : 2012-04-09
Age : 25
Location : Bolton, England
Re: WIP New class 142
![]() by mrknowitall Sat Apr 14, 2012 3:57 am
by mrknowitall Sat Apr 14, 2012 3:57 am
robbysmith13 wrote:Hey Everyone,
I am starting on making a brand new Class 142 with every control and function like Radio, announcement plus a 3D Cab with Interior and Exterior with a Working and changeable Destination display.
Exterior Working Bogies, Display, Hopefully operating doors, Moving wheels and functional lights.
Interior On/Off interior lights, Full working announcements, Operating doors.
If anyone drives a class 142 please can they post what they do starting the train up like from the outside to the cab, Thanks
This is not possible

a 142 has not got "bogies"
Sorry to burst your bubble, but for the rest, i wish you the best of luck!

mrknowitall- Posts : 824
Join date : 2011-07-09
Age : 31
Location : W. Yorkshire
Re: WIP New class 142
![]() by graymac Sat Apr 14, 2012 10:18 am
by graymac Sat Apr 14, 2012 10:18 am
Are the "hopefully operating doors" due to a faulty mechanism or is this a new random feature?

graymac- Posts : 2134
Join date : 2011-08-28
Location : Co Mayo, Eire -

Re: WIP New class 142
![]() by Adelante107 Wed Apr 25, 2012 1:27 am
by Adelante107 Wed Apr 25, 2012 1:27 am

This is the only image I have of inside the cab but it could be used as a reference image?

Adelante107- Posts : 27
Join date : 2012-02-01
Age : 30
Location : Hartlepool
Re: WIP New class 142
![]() by graymac Wed Apr 25, 2012 11:38 am
by graymac Wed Apr 25, 2012 11:38 am
graymac- Posts : 2134
Join date : 2011-08-28
Location : Co Mayo, Eire -
Re: WIP New class 142
![]() by Guest Wed Apr 25, 2012 8:48 pm
by Guest Wed Apr 25, 2012 8:48 pm
I honestly tried to do a 3d cab of the class 142, because I was lucky enough to be permitted on supervision to take photos of inside the 142 cab, but I took them too quick and every photo retrieved was totally out of focus.Adelante107 wrote:This is the only image I have of inside the cab but it could be used as a reference image?
Guest- Guest
busheyheath- Posts : 297
Join date : 2012-01-05
Location : Netherlands
Re: WIP New class 142
![]() by robbysmith13 Fri May 04, 2012 8:21 pm
by robbysmith13 Fri May 04, 2012 8:21 pm
robbysmith13- Posts : 28
Join date : 2012-04-09
Age : 25
Location : Bolton, England
Re: WIP New class 142
![]() by robbysmith13 Sat Jun 02, 2012 9:49 pm
by robbysmith13 Sat Jun 02, 2012 9:49 pm
[url=
 Uploaded with ImageShack.us] Uploaded with ImageShack.us[/url]
robbysmith13- Posts : 28
Join date : 2012-04-09
Age : 25
Location : Bolton, England
Re: WIP New class 142
![]() by mrknowitall Fri Jun 08, 2012 1:18 pm
by mrknowitall Fri Jun 08, 2012 1:18 pm
mrknowitall- Posts : 824
Join date : 2011-07-09
Age : 31
Location : W. Yorkshire
Re: WIP New class 142
![]() by Drag0nflamez Fri Jun 08, 2012 1:53 pm
by Drag0nflamez Fri Jun 08, 2012 1:53 pm
actually, iirc there was a B3D plugin for zmodeler.mrknowitall wrote:No one else has stated so yet, so looks like im the one who has to say this, your programming software is incompatible with openBVE and your time has been wasted going down the path of "3d Software" to do that work instead of doing it by hand in notepad, remember, notepad is a mans best friend, along with coffeelots of coffee.
Drag0nflamez- Posts : 210
Join date : 2012-05-11
Location : The Netherlands
Re: WIP New class 142
![]() by mrknowitall Fri Jun 08, 2012 1:54 pm
by mrknowitall Fri Jun 08, 2012 1:54 pm
mrknowitall- Posts : 824
Join date : 2011-07-09
Age : 31
Location : W. Yorkshire
Re: WIP New class 142
![]() by robbysmith13 Fri Jun 08, 2012 2:13 pm
by robbysmith13 Fri Jun 08, 2012 2:13 pm
robbysmith13- Posts : 28
Join date : 2012-04-09
Age : 25
Location : Bolton, England
Re: WIP New class 142
![]() by mrknowitall Fri Jun 08, 2012 2:20 pm
by mrknowitall Fri Jun 08, 2012 2:20 pm
If all of above is no, id say Graymac and dennis lance are probably the best to ask for links for guides and other thing
mrknowitall- Posts : 824
Join date : 2011-07-09
Age : 31
Location : W. Yorkshire
Re: WIP New class 142
![]() by Dexter Fri Jun 08, 2012 2:40 pm
by Dexter Fri Jun 08, 2012 2:40 pm

Dexter- Posts : 2153
Join date : 2011-07-08
Age : 38
Location : Brno, Czech republic -
Re: WIP New class 142
![]() by Quork Fri Jun 08, 2012 6:44 pm
by Quork Fri Jun 08, 2012 6:44 pm
Now that it's said... *slurp my coffee*

Quork- Posts : 1437
Join date : 2012-05-05
Age : 32
Location : Hofheim a.T., Hessen (Hesse), European Union
Re: WIP New class 142
![]() by robbysmith13 Fri Jun 08, 2012 9:59 pm
by robbysmith13 Fri Jun 08, 2012 9:59 pm
robbysmith13- Posts : 28
Join date : 2012-04-09
Age : 25
Location : Bolton, England
Re: WIP New class 142
![]() by mrknowitall Sat Jun 09, 2012 12:15 am
by mrknowitall Sat Jun 09, 2012 12:15 am
mrknowitall- Posts : 824
Join date : 2011-07-09
Age : 31
Location : W. Yorkshire
Re: WIP New class 142
![]() by mrknowitall Sat Jun 09, 2012 12:57 am
by mrknowitall Sat Jun 09, 2012 12:57 am
Below is a run through off all file types and also links too, please be aware these are old now as i wrote these up a while ago, and some text may come trough wrong as i have taken this off my old bve4trainz website
Have you been searching around the web for a train you really like but fail every time? Chances are that it has not been made yet. If this is the case why not give it a go your self? We all started the same way! There are many ways you can develop for the simulator, be it textures, routes, trains, externals or plugins.
So lets build! First of all there are two types of files to build with, a .b3d and a .csv. Some do know where to go for info but others who don't have a clue on what both file types are don't worry, here's a little bit of info about both file formats.
Like many old developers who made things before the .csv file, there is the .b3d file. Below is a quick run through of how to start developing for openbve with this file type, its not a tutorial though, only a run through.
.B3D
>>>>
so a .b3d file? what is it? and what do you do with it ? well here is a little run through of a .b3d file and how to create a object with a .b3d
so many new people to openbve are unsure of how to create an external view, and feel very reluctant to "hand code" because basically, they don't have a clue how to. openbve developers have their own way of doing things, and which type of file they do it in. for me all my trains are done via a .csv file, but many developers have used the b3d file way before the .csv file was introduced into developing for Openbve. i have only ever used this type of file once and ever since have being reluctant to use it. but here is another run through of how to make a square.
notepad
excel (not necessary but some prefer it, i actually hate it and never use it)
a coffee/tea
and a cool attitude (things can get aggressive when things go wrong)
now open up the .b3d file which is attached to the bottom of this page (click the download button and save to your desktop). and then open, if a Microsoft excel type button is the little picture for the file then right click and then open with, go down the list and select notepad. remove the little header file i made for a demonstration and lets begin!
to begin any type of object we always have to start with;
[meshbuilder]
so now the simulator now knows where about to begun a new face. so now its time to add our faces. so we will make a square, in this case the side of the train. so how many sides has a flat square got? 4! so now we add four add vertex's
vertex -1,3,-12
vertex -1,3,12
vertex -1,0,12
vertex -1,0,-12
then afterwards we would have to add a bit of coding which will tell the simulator what way our face will be displayed.
face 0,1,2,3
or if we would like to make this view able from both sides we would do this.
face2 0,1,2,3
the number two after addface tells the simulator that we want two faces to be shown, one on either side.
set texture co-ordinates has already got an explanation in the eejits guide. so please follow the links to read the relivent info.
https://bveworldwide.forumotion.com/t83-another-eejits-guide
the first post has the attachment.
Then we have the .csv, a relativity new file type to openbve and one of the main file types used by new developers. Here's a run through of this file type on the link below.
.CSV
>>>
so a .csv file? what is it? and what do you do with it ? well here is a little run through of a .csv file and how to create a object with a .csv
so many new people to openbve are unsure of how to create an external view, and feel very reluctant to "hand code" because basically, they don't have a clue how to. openbve developers have their own way of doing things, and which type of file they do it in. for me all my trains are done via a .csv file, because its the one i learnt from when i first started. there are no extra programs of editing software you need to create a good basic train! below is what you need.
notepad
excel (not necessary but some prefer it, i actually hate it and never use it)
a coffee/tea
and a cool attitude (things can get aggressive when things go wrong)
now open up the .csv file which is attached to the bottom of this page (click the download button and save to your desktop). and then open, if a Microsoft excel type button is the little picture for the file then right click and then open with, go down the list and select notepad. remove the little header file i made for a demonstration and lets begin!
to begin any type of object we always have to start with;
createmeshbuilder,
so now the simulator now knows where about to begun a new face. so now its time to add our faces. so we will make a square, in this case the side of the train. so how many sides has a flat square got? 4! so now we add four add vertex's
addvertex,-1,3,-12
addvertex,-1,3,12
addvertex,-1,0,12
addvertex,-1,0,-12
then afterwards we would have to add a bit of coding which will tell the simulator what way our face will be displayed.
addface,0,1,2,3
or if we would like to make this view able from both sides we would do this.
addface2,0,1,2,3
the number two after addface tells the simulator that we want two faces to be shown, one on either side.
set texture co-ordinates has already got an explanation in the eejits guide. so please follow the links to read the relivent info.
https://bveworldwide.forumotion.com/t83-another-eejits-guide
the first post has the attachment.
Once you have got the hang of B3D and CSV files why not try to go the next step? A few files together (I.E a door) then you will want to know about the .ANIMATED file. so heres the only run through in a easy read way about how to create objects in a animated file!
.ANIMATED
---------------------------------------- overview and sections ------------------------------------
well here's a bit of easy reading and explanation of a few area's on Michelle's site.
CODE:
[Include]
basically it does what it says on the tin, if you wish to include another .CSV , .b3d & .ANIMATED file you would just pop include into a animated file basically to tell the program you wish to include which ever file you need.
< mark 4 coach with no door's.ANIMATED>
[Include]
a door.csv
CODE:
FileName0
FileName1
FileName2
...
This is not actual coding, but actually refer's to what file you wish to include like above.
< mark 4 with no door's.ANIMATED>
[Include]
a door left front.csv
a door right front.csv
a door left back.csv
a door right back.csv
CODE:
Position = X, Y, Z
so lets recap, so far we have the mark 4 coach with no doors in one csv, then we have made 4 other csv's with a door in each facing the way they should relevant to the coach it's self. we have 1 .ANIMATED file which now has the > include < section and then all the different door .csv's. now we need to move then into place, this is where this coding comes into play. if you have good knowledge of coding this should not be hard to explain.
X,Y,Z = left,right ,, up and down ,, forward and backwards
now that's the overview (No.1) section explained a bit more simpler. now section 2
You can use the [Object] section to create a single animation. This requires to set up at least one state via the States parameter, and to use any combination of functions you want, which provide control over the animation. There can be any number of [Object] sections within the file.
so this is a quick explanation of the power which the [object] in the .ANIMATED file can do. when she explains that at least one state needs to be made via the states parameter is because if you don't, you may as well use the [include] as this will work for placing an object instead of wanting to animate it. when you see the explanation that you may wish to use as many functions as possible its basically explaining that if you wished to make the door open forward, and then slide back, you can. although the coding for that is not on the site it doesn't mean its not possible.
so now lets give things a try!
CODE:
[Object]
CODE:
Position = -1.5,0,-7
basically the first is -1.5 meters to the left of the car ( or what ever the side of the car is in the original .csv) , the second is 0 because the doors should not site higher or lower than the car, and the third being towards the rear end of the car (this is for a centered car ONLY!! if your car is built from o to 24 and not -12 to 12 in length then adjustments will need to be made)
CODE:
States = File0, File1, ..., Filen-1
well this is where you state what you are wanting to use in the formula you are creating. if you wished to make a flashing light then you would use two .csv's one with a light showing, and one with it not showing. then pop them into the code, but in this case its the front left door. so it would be as follows.
CODE:
States = frontleftdoor.csv
now the hard part, it took me 2 weeks of maths, thinking and brain microwaving to figure this out and will be hard for me to explain even though i actually figured the coding out. so there may be errors and i can not confirm the following due to me writing this without looking in depth to the animation today and loading things up and testing things out. but from my countless weeks of head aches i can and will do my best to explain.
so lets look at what we got in our .ANIMATED file so far
CODE:
[Object]
Position = -1.5,0,-7
States = frontleftdoor.csv
so we have a boring door sat there now on our carriage with no animation, now here is the animation.
please note the coding below would not be for the mark 4 coach stock, they use slam closing doors, the coding is for bi parting plug-in doors.
CODE:
TranslateXFunction = min[leftDoors,0.1]
X = left and right. so
CODE:
min
actually makes the door go outwards by 0.1 and
CODE:
-min
makes the doors go inside the train by 0.1 the
CODE:
[leftdoors]
assigns it to a key command, which believe it or not is the leftdoor command which is ordered once the key F5 is pressed in a simulation. ( just a shame that BuildACrossingForMe key is not assigned as yet )
so now we have a door that now comes out when the key is pressed. but apart from coming outwards we need her to now slide out the way so the heavier kind of passenger can get in! this is where the next bit of coding comes in handy.
CODE:
TranslateZFunction = leftdoors[0]
same again ,
CODE:
Z
forward or backwards
CODE:
leftdoors
the simulations key press command
CODE:
[0]
makes the door move downwards away from the door by the size of the door itself.
CODE:
[1]
makes the door move upwards by the size of the door in the .csv
so now the full coding should be like this
CODE:
[Object]
Position = -1.5,0,-7
States = frontleftdoor.csv
TranslateXFunction = min[leftDoors,0.1]
TranslateZFunction = leftdoors[0]
now above is a re post of a a comment in Gray's section, and had actually explained how to make a door. so now i will continue on with explaining as much more of the ANIMATED file as i can, so lets continue..
CODE:
RotateXDirection = X, Y, Z
RotateYDirection = X, Y, Z
RotateZDirection = X, Y, Z
CODE:
RotateXFunction = Formula
RotateYFunction = Formula
RotateZFunction = Formula
now the two above items are both for rotate, and if you look closely you will see one with a formula and one with the co-ordinates. well the formula is what ever type of command you make for that item, and the key command (example being leftdoor for the f5 key etc..) for when it is used, and then the co-ordinates for you to manually explain to the simulator what you want to happen.
CODE:
TextureShiftXDirection = X, Y
TextureShiftYDirection = X, Y
this is what it says on the tin, shifting the texture you decide to shift in which ever direction you wish to move "shift it" to. but remember this would be in a piece of coding and not used as a single command.
try to think of an old bus, and the driver had a little metal piece sticking out above the window section which he spun around for him to select the destination? well this can be used like that
CODE:
RefreshRate = Seconds
now this is simple, although this does not help does it ?
This defines the minimum amount of time that needs to pass before the functions are updated. A value of 0 forces the functions to be updated every frame. Please note that objects outside of the visual range might be updated less frequently regardless of this parameter. Use RefreshRate when you don't need a perfectly smooth animation (in order to optimize performance), or when you deliberately want the object to be only updated in fixed intervals.
so basically you but the amount of seconds per face that is shown , then followed by the amount of faces which are actually in the slide show. but yet again with nearly every type of animation in openbve, it is not used singly, and has to be a part of a command, but dont worry as always ill explain with coding.
CODE:
[Object]
Position = 0, 0, 0
States = header1.csv,header2.csv
statefunction = Mod[value + pluginstate[20], 2]
RefreshRate = 6
lets break it up
CODE:
[Object]
Position = 0, 0, 0 - the posistion
States = header1.csv,header2.csv - stating which files your wanting shown
statefunction = Mod[value + pluginstate[20], 2] - now ill explain this underneath in more detail
RefreshRate = 6 - here she is! telling the simulator that your wanting a 6 second wait per file that's shown.
now this is a PLUG IN SPECIFIC ITEM AND WILL NOT WORK ON ANY NON UK PLUG IN'S THE SAME WAY
statefunction = Mod[value + pluginstate[20], 2] - now ill explain this underneath in more detail
so straight away we have our state function section, the we have a mod, which means where about to modify the section of the coding. then we have the value, meaning where about to add an addition to the coding which is the pluginstate , in this case plug in state [20] which on the uk plugin is key 5 (although off the top of my head im not sure if this is right so look out for an edit or two), now this mean;s when our plugin state (our key is pressed) we then override that function making it stop on which ever file its on. and then press again to continue the process
Lists 3 to 6 are not really in need of explaining, if you don;t understand them i would advise asking around for bits of information, but mostly they explain a few things, and are to be added to commands, but a rarely seen anyway so not really a big issue.
___________________________________________________________________________________________________________________
now a few examples for you all to overlook ;
this is a header file in which two files can be changed;
CODE:
[Object]
Position = 0, 0, 0
States = header1.csv,header2.csv
statefunction = Mod[value + pluginstate[20], 2]
RefreshRate = 6
you can change both the amount of faces that you wish to have their and and on the state function there is a 2 on the end, now the amount of files you wish to have in the states = file,0,1,2,... section that amount needs to be put there;
States = 0,1,2,3,4,5
now put the amount here ;
statefunction = Mod[value + pluginstate[20],***** 6*****] dont put the stars though
CODE:
[Object]
Position = 0, 0, 0
States = 350-1.csv, 350lights1.csv, 350lights2.csv, 350lights3.csv
statefunction = pluginstate[20]
[Object]
Position = 0, 0, 0
States = 350-1.csv, 350lights1.csv, 350lights2.csv, 350lights3.csv
statefunction = pluginstate[17]
this is for lights, and here's the MOD again ,and another 2 plug in states, [20] key number 5 and [17] key number 4
now the proper plug in door commands! these doors even in real life work as a team both pop outwards and then one slides towards the front, and one towards the back. in the case of the coding below the first code section pops out the towards the fron of the train and the second towards the back of the train.
CODE:
[Object]
Position = 0, 0,0
States = left3.csv
TranslateXFunction = min[leftDoors,0.1]
TranslateZFunction = -leftdoors[0]
RefreshRate = 0.01
[Object]
Position = 0, 0, 0
States = left4.csv
TranslateXFunction = min[leftDoors,0.1]
TranslateZFunction = leftdoors[0]
RefreshRate = 0.01
now wait a minute? thts only the left side section! what about the right side? don't worry ill make your life a little bit more easier;
CODE:
[Object]
Position = 0, 0,0
States = right4.csv
TranslateXFunction = -min[rightDoors,0.1]
TranslateZFunction = -rightdoors[0]
RefreshRate = 0.01
[Object]
Position = 0, 0, 0
States = right3.csv
TranslateXFunction = -min[rightDoors,0.1]
TranslateZFunction = rightdoors[0]
RefreshRate = 0.01
now wheels right ?
CODE:
Position = -0.72, 0.42, 1.12
states = bogieleft.csv
RotateXFunction = value + delta * speedometer / 0.625
loads of jargon again? ill try explain below
Position = -0.72, 0.42, 1.12 - where you are wanting the wheel on the train (bearing in mind you already made the external with bogies with no wheels first)
states = bogieleft.csv - the left hand wheel which you have already made ( im not doing everything for you )
RotateXFunction = value + delta * speedometer / 0.625 - now everything upto the / is telling the simulator its the roatation of the wheel to accordance of the speedometer, if your in a 66 spinning its wheels, these wheels will be spinning at that speed! even though your going no where!
now the /0.625 is the circumference of the wheel.
mrknowitall- Posts : 824
Join date : 2011-07-09
Age : 31
Location : W. Yorkshire
Re: WIP New class 142
![]() by graymac Sat Jun 09, 2012 10:12 am
by graymac Sat Jun 09, 2012 10:12 am
graymac- Posts : 2134
Join date : 2011-08-28
Location : Co Mayo, Eire -
Re: WIP New class 142
![]() by mrknowitall Sat Jun 09, 2012 10:22 am
by mrknowitall Sat Jun 09, 2012 10:22 am
You can choose any of my excuses to why i didnt do it like that
mrknowitall- Posts : 824
Join date : 2011-07-09
Age : 31
Location : W. Yorkshire
robbysmith13- Posts : 28
Join date : 2012-04-09
Age : 25
Location : Bolton, England
Page 1 of 2 • 1, 2 ![]()